Git Flow - 2. 샘플 프로젝트를 통한 사용법 예시 (How to/Tutorial)
Git Flow 사용법에 대해 정리하는 김에 간단한 프로젝트 상황을 가정하고 설명하는 것이 효과적이라 생각했다.
지라에서 관리되는 파이썬 포탈 서비스 프로젝트(PPP)를 예시로 Git Flow를 이용해 개발하는 과정을 단계별로 정리해보았다. 깃허브에 실제 커밋 내역이 담겨져 있는 샘플 프로젝트 코드를 바탕으로 사용법을 작성했다. 기본적인 Git Flow 브랜치 전략의 사상에 따라 정리된 내용이며, 실제 적용 시에는 팀에 따라 조금씩 변경해 적용될 수 있다.
깃허브 링크: jinwoo1990/git-flow-tutorial
단계별 과정을 하나하나 설명하다보니 글이 많이 길어졌다. 자세한 예시와 설명보다는 실제 사용하는 커맨드 위주의 정보를 알고 싶다면 Git Flow - 3. 사용법 요약 및 팁 를 참조하기 바란다.
설치
brew install gitbrew install git-flow-avh- git flow로 시작하는 커맨드를 활용할 수 있게 함
- git flow 활용 시 반복적인 커맨드 작성을 간단하게 함
- git flow 예시
git flow feature finish --no-ff PPP-1-do-something
- git 예시
git checkout developgit merge --no-ff PPP-1-do-somethinggit branch -d PPP-1-do-something
시작
git flow init
$ git flow init
Initialized empty Git repository in /Users/test/git-test/.git/
No branches exist yet. Base branches must be created now.
Branch name for production releases: [master]
Branch name for "next release" development: [develop]

How to name your supporting branch prefixes?
Feature branches? [feature/]
Bugfix branches? [bugfix/]
Release branches? [release/]
Hotfix branches? [hotfix/]
Support branches? [support/]
Version tag prefix? []
Hooks and filters directory? [/Users/test/git-test/.git/hooks]
- git flow init 을 통해 master 브랜치와 develop 브랜치를 생성
- 기본적으로 master/develop 브랜치가 아닌 브랜치는 개발 진행하며 생성하는 구조
- 개발하면서 생성하게 될 feature/release/hotfix 브랜치들의 prefix와 version prefix 를 정함
- 커맨드 실행 후 별도의 값을 입력하지 않으면 기본 prefix (feature, release, hotfix) 로 설정이 완료됨
- e.g. feature 브랜치는
git flow feature start PPP-1-do-something을 실행하면 feature/PPP-1-do-something 로 자동으로 prefix 가 붙어서 브랜치가 생성됨
- e.g. feature 브랜치는
이미 있는 원격 브랜치를 받아올 때
$ git clone <github 주소>
- git clone을 통해 원격 저장소의 코드를 불러옴
$ git branch -a
* develop
  remotes/origin/HEAD -> origin/develop
  remotes/origin/develop
  remotes/origin/feature/PPP-5-task
  remotes/origin/master
- 기본적으로 clone 을 실행하면 default 브랜치만 로컬에 생성됨
- 원격에 있는 master 브랜치도 로컬에 가져온 후 연결이 필요
$ git checkout -t master origin/master
- git checkout -t <저장할 로컬="" 브랜치명=""> <원격 저장소="" 브랜치명=""> 로 원격에 있는 브랜치를 로컬로 가져오고 연동
- 만약 원격에 feature 브랜치가 존재하고 해당 브랜치에 대한 작업이 필요하다면 커맨드를 수정해 가져올 수 있음
$ git flow init

Which branch should be used for bringing forth production releases?
   - develop
   - master
Branch name for production releases: [master]

Which branch should be used for integration of the "next release"?
   - develop
Branch name for "next release" development: [develop]

How to name your supporting branch prefixes?
Feature branches? [feature/]
Bugfix branches? [bugfix/]
Release branches? [release/]
Hotfix branches? [hotfix/]
Support branches? [support/]
Version tag prefix? []
Hooks and filters directory? [/Users/test/git-flow-tutorial/.git/hooks]
- git flow 커맨드 실행을 위해서는
git flow init을 실행해줘야 함 - master 브랜치를 로컬에 가져왔다면 기본 설정대로 모두 enter 쳐주면 git flow 사용 가능한 환경이 설정됨
- 안 가져온 상태이면 Branch name for production releases: [] 에서 master 를 입력하면 됨
Githooks 설정
# git hook 실행 파일 참조 경로 변경
$ git config core.hooksPath .githooks

# git hook 참조 파일 경로 변경 확인
$ git config --get core.hooksPath
- 참조 파일 경로 변경을 통해 프로젝트 단위로 관리할 수 있는 git hook 설정
- 프로젝트 단위로 관리가능하도록 루트 디렉토리의 .githooks 폴더를 git hook 실행 파일 위치로 지정
- 기본값은 ~/gitflow-tutorial/.git./hooks 폴더에 prepare-commit-msg.sample, update.sample 과 같은 식으로 저장되어 있음
- .sample 을 지워야 git 에서 인식해서 작동할 수 있는 방식으로 개발되어있음
prepare-commit-msg 파일
#!/bin/bash

# This hook works for branches named such as "feature/ABC-123-description" and will add "[ABC-123]" to the commit message.

# get current branch
branchName=`git rev-parse --abbrev-ref HEAD`

# search jira issue id in a pattern such a "feature/ABC-123-description"
jiraId=$(echo $branchName | sed -nE 's,[a-z]+/([A-Z]+-[0-9]+)-.+,\1,p')

# only prepare commit message if pattern matched and jiraId was found
if [[ ! -z $jiraId ]]; then
 # $1 is the name of the file containing the commit message
 # sed -i.bak -e "1s/^/\n\n[$jiraId]\n/" $1
 echo -e "[$jiraId] ""$(cat $1)" > "$1"
 # echo -e "[$jiraId]\n""$(cat $1)" > "$1"
 # sed -i.bak -e "1s/^/$TRIMMED /" $1
fi
prepare-commit-msg 실행 권한 부여
$ chmod +x prepare-commit-msg
- prepare-commit-msg 파일을 위와 같이 작성 후 실행 권한을 부여하면 git hook이 작동 시작
- Git hook이 적용되면 feature/ABC-123-description 형식의 브랜치에서 작업하면 커밋 메세지 앞에 ABC-123 과 같이 이슈 넘버를 붙여줌
- ABC-123-description 과 같은 포맷이어야 작동
- 커맨드:
git commit -m ‘Feat: 로그인 기능 구현’→ 입력: [PPP-1] Feat: 로그인 기능 구현 - ABC-123 도 작동하지 않음 (-description 까지 적어주는 것 강제, 추후 로그 확인 편함)
- release/0.1, hotfix/0.2, develop과 같은 브랜치에서 커밋 시에는 아무런 작동 없이 커밋 메세지가 그대로 작성됨
Feature 개발 - 1. 코드 리뷰가 필요없다 판단될 때
git pull –rebase origin develop
$ git pull --rebase origin develop
- feature 브랜치를 생성하기 전에 원격 develop 브랜치에서 최신의 코드를 받아옴
- 항상 로컬 develop 브랜치를 원격 develop 브랜치와 일치시켜줘야 함
git flow feature start PPP-4-login
$ git flow feature start PPP-4-login
Switched to a new branch 'feature/PPP-4-login'

Summary of actions:
- A new branch 'feature/PPP-4-login' was created, based on 'develop'
- You are now on branch 'feature/PPP-4-login'

Now, start committing on your feature. When done, use:

     git flow feature finish PPP-4-login
- Jira 이슈 티켓 기능 개발을 위해 feature 브랜치를 생성
- 예시적으로 PPP (Python Portal Project) 라는 프로젝트의 이슈 개발 사항을 가정
git flow feature start <feature name>에서에 이슈 번호를 붙여서 feature 이름을 작성하면 git flow init 에서 지정한 prefix 인 “feature/” 가 자동으로 붙어서 브랜치가 생성됨
개발 코드 커밋
$ git commit -m 'Feat: 로그인 기능 구현'
[feature/PPP-4-login 0e5a183] [PPP-4] Feat: 로그인 기능 구현
 1 file changed, 1 insertion(+)
 create mode 100644 login.py
- login.py 에 login 기능 구현 후 이슈 번호를 포함해 커밋 메세지 작성
- Jira 해당 티켓에 연동 위함
- githooks 사용시 브랜치명을 바탕으로 커밋 메세지 시작에 이슈 번호를 붙일 수 있음
- PPP-1-login 에서 -login 앞의 PPP-1 을 자동으로 커밋 메세지 맨 앞 부분에 포함
- e.g. 커맨드:
git commit -m ‘Feat: 로그인 기능 구현’→ 입력: [PPP-1] Feat: 로그인 기능 구현
git flow feature finish –no-ff PPP-4-login (** –no-ff 필수)
$ git flow feature finish --no-ff PPP-4-login
Branches 'develop' and 'origin/develop' have diverged.
And local branch 'develop' is ahead of 'origin/develop'.
Switched to branch 'develop'
Merge made by the 'recursive' strategy.
 login.py | 1 +
 1 file changed, 1 insertion(+)
 create mode 100644 login.py
Deleted branch feature/PPP-4-login (was 0e5a183).

Summary of actions:
- The feature branch 'feature/PPP-4-login' was merged into 'develop'
- Feature branch 'feature/PPP-4-login' has been locally deleted
- You are now on branch 'develop'
- 해당 이슈 개발이 끝났을 때 finish를 통해 feature 브랜치를 develop 브랜치로 merge 후 삭제
- git 에서 다음과 같은 기능을 한 번에 수행
git checkout developgit merge --no-ff PPP-1-do-somethinggit branch -d PPP-1-do-something
- [참조] –no-ff 옵션을 주지 않으면 커밋이 한 개일때나 fast-forward merge 가 가능하면 어떤 브랜치에서 merge 했는지 기록이 보이지 않게 merge 해버림 → 이력 관리에 안 좋음 (–no-ff 옵션 필수)
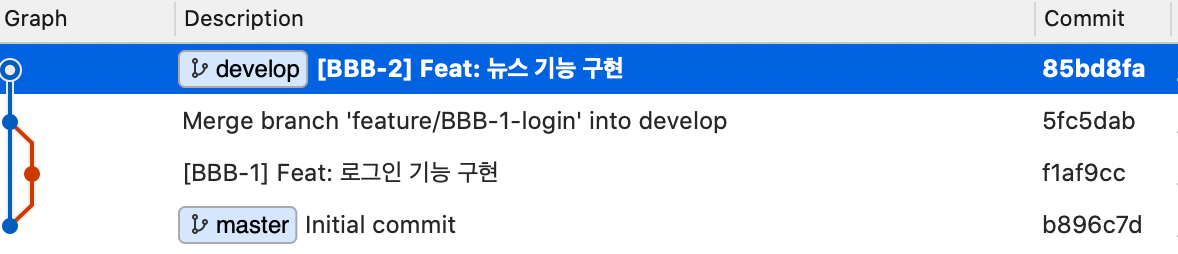
- 깃허브 링크: jinwoo1990/git-test
-
–no-ff 옵션으로 merge 수행 시

- develop 브랜치에서 feature/BBB-1-login 브랜치가 분기되어 작업 완료한 merge 히스토리를 알 수 있음
-
–no-ff 옵션 사용하지 않고 merge 수행 시
- merge 이력이 남지 않아 feature 가 만들어지고 사라진 것에 대한 히스토리 추적 불가능
- 주기적으로
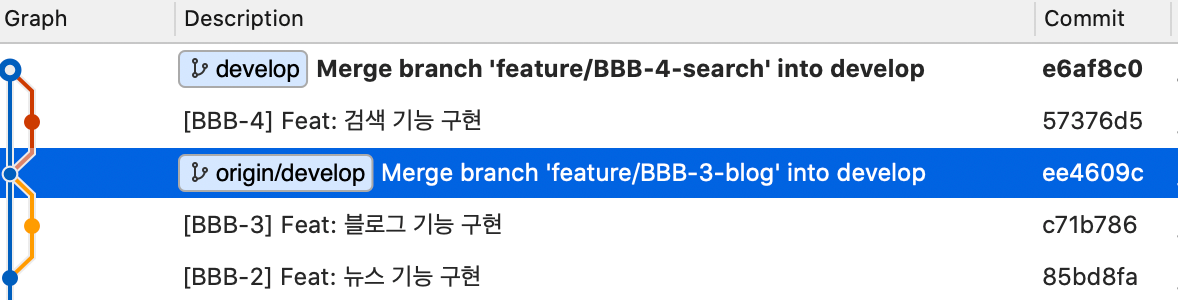
git pull --rebase origin develop을 통해 팀원이 작업한 코드 반영 필요 (–rebase 옵션 필수)- 깃허브 링크: jinwoo1990/git-test
-
–rebase 옵션 사용 시
- 원격 develop 브랜치의 최신본을 기준으로 코드를 갱신해 커밋 그래프가 얽히지 않고 순차적으로 구현된 것처럼 깔끔하게 구성됨
- feature/BBB-3-blog 브랜치와 feature/BBB-4-search 브랜치는
85bd8fa커밋에서 같이 분리되었으나 feature/BBB-4-search 브랜치 개발 진행 시 먼저 완료되어 origin/develop 에 반영된 feature/BBB-3-blog 의 코드를git pull --rebase origin develop으로 받아옴으로써 BBB-3-login 기능이 구현된 후에 순차적으로 작업이 진행된 것처럼ee4609c커밋에서 rebase 된 상태로 결과를 보여줌
-
–rebase 옵션 사용하지 않을 시
- 같은 곳에서 분기하고 있음
- -rebase 옵션 사용 시 순차적이지 않고 여러 군데에서 섞여지는 그래프로 나타남
- 개발이 복잡해질수록 그래프가 더 알 수 없게 변하고 이력 추적이 어려워짐
- [주의] develop 브랜치가 remote 보다 이전 버전이면 finish 커맨드가 실행되지 않음
- develop 브랜치로 돌아가 pull 한 후에 다시 finish해야 함
git checkout develop→git pull --rebase origin develop
- 해당 이슈가 끝나면 브랜치를 develop 에 merge 하고 삭제함으로써 작업 관리에 용이하고 브랜치 생성/관리에 일관성을 부여 (네이밍, 커밋메세지작성, 수명주기 등)
git push origin develop
- 개발 완료된 사항을 develop 브랜치에 반영
Feature 개발 - 2. 코드 리뷰가 필요할 때
git flow feature start PPP-5-news & git flow feature publish PPP-5-news
$ git flow feature start PPP-5-news
Switched to a new branch 'feature/PPP-5-news'

Summary of actions:
- A new branch 'feature/PPP-5-news' was created, based on 'develop'
- You are now on branch 'feature/PPP-5-news'

Now, start committing on your feature. When done, use:

     git flow feature finish PPP-5-news
$ git flow feature publish PPP-5-news
Total 0 (delta 0), reused 0 (delta 0), pack-reused 0
remote:
remote: Create a pull request for 'feature/PPP-5-news' on GitHub by visiting:
remote:      https://github.com/jinwoo1990/git-flow-tutorial/pull/new/feature/PPP-5-news
remote:
To https://github.com/jinwoo1990/git-flow-tutorial.git
 * [new branch]      feature/PPP-5-news -> feature/PPP-5-news
Branch 'feature/PPP-5-news' set up to track remote branch 'feature/PPP-5-news' from 'origin'.
Already on 'feature/PPP-5-news'
Your branch is up to date with 'origin/feature/PPP-5-news'.

Summary of actions:
- The remote branch 'feature/PPP-5-news' was created or updated
- The local branch 'feature/PPP-5-news' was configured to track the remote branch
- You are now on branch 'feature/PPP-5-news'
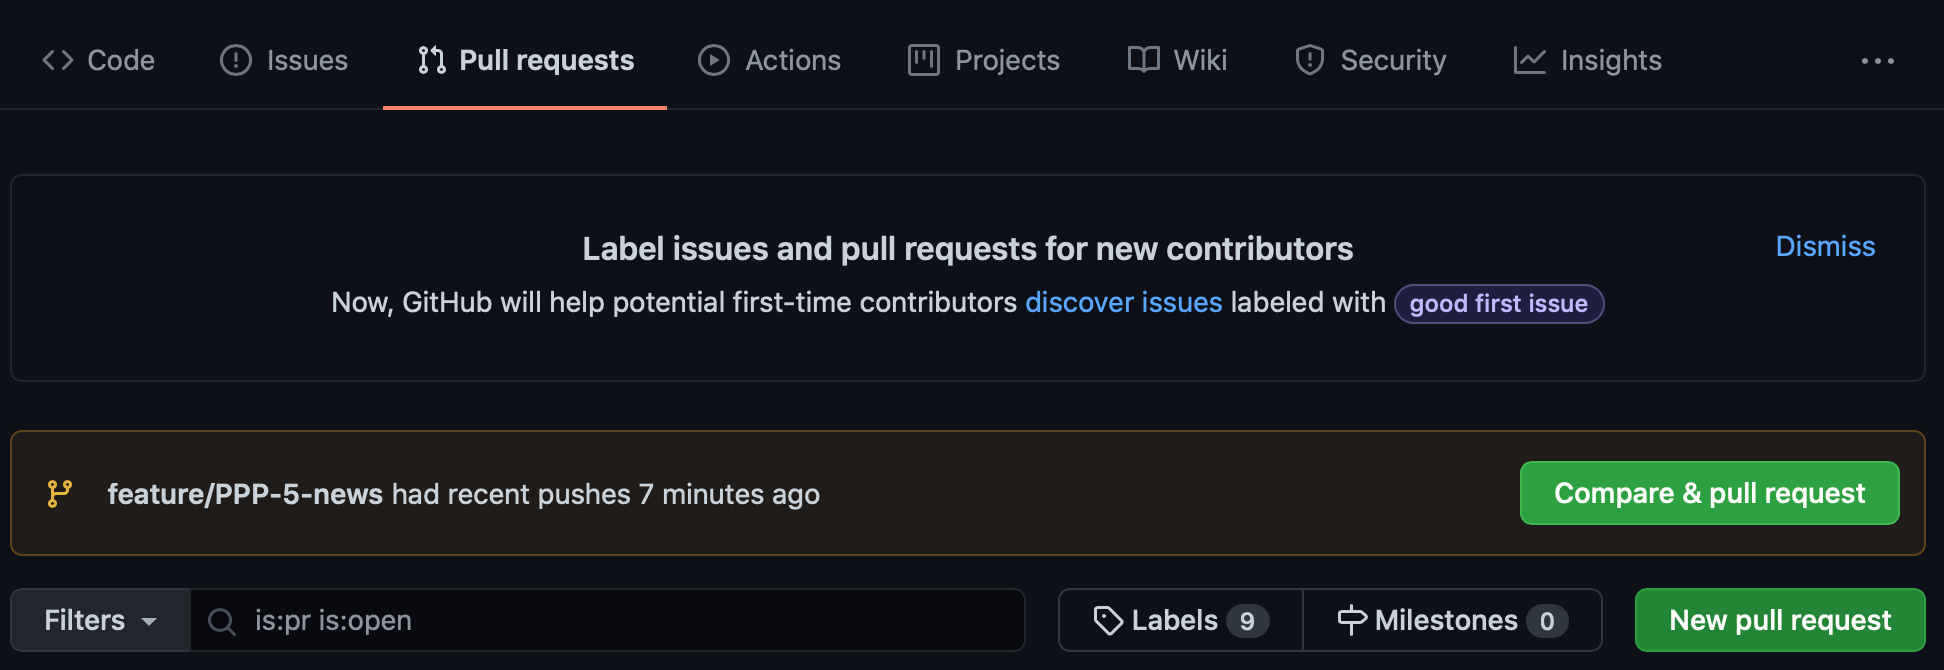
git flow feature start PPP-5-news로 먼저 feature 브랜치를 생성git flow feature publish PPP-5-news를 통해 원격 저장소에 브랜치가 생성됨- 코드 리뷰 필요 시 Pull Request 사용을 위해 원격 저장소로 코드 push
- 추가 활용 목적
- local 에만 존재하는 feature 브랜치를 원격 저장소에 push 하고 싶을 때 사용
- 다른 컴퓨터에서도 feature 브랜치에 접근하거나 다른 사람과 함께 feature 브랜치를 작업할 때 사용
개발 코드 커밋
$ git commit -m 'Feat: 뉴스 기능 구현'
[feature/PPP-5-news f02178b] [PPP-5] Feat: 뉴스 기능 구현
 1 file changed, 1 insertion(+)
 create mode 100644 news.py
- 새로운 이슈 번호를 붙여 커밋 메세지 작성
git push origin feature/PPP-5-news로 원격 저장소에 코드 push
Pull Request 생성 및 Merge
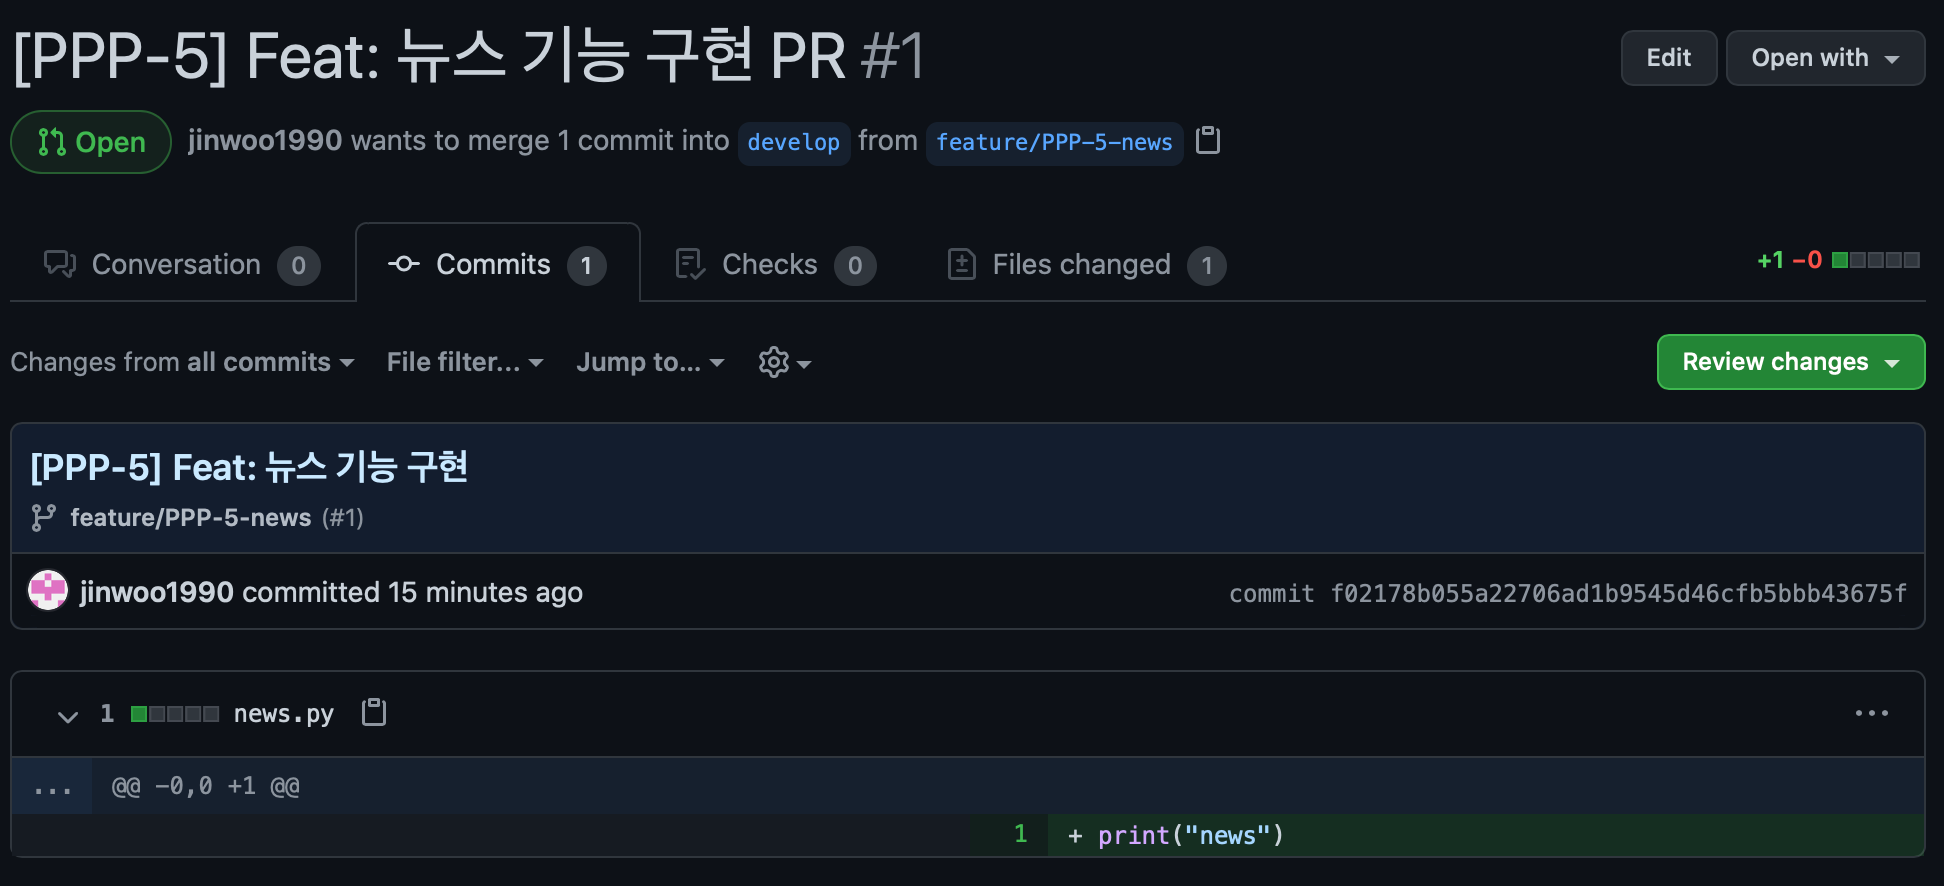
- Compare & pull request 클릭해 base(develop 브랜치), compare(feature/PPP-5-news) 의 Pull Request 생성

- 제목에 이슈 번호 PPP-5 를 포함하고 커밋들을 통합할 수 있는 개념으로 Pull Request 제목을 작성
- Jira 에서 Pull Request 항목에 ‘PPP-5 뉴스 기능 구현 PR’로 나옴 (커밋과는 별도 취급)
- Pull Request 를 받은 후 변경 사항을 점검 (Github 기능을 이용해 변경 이력 확인 용이)
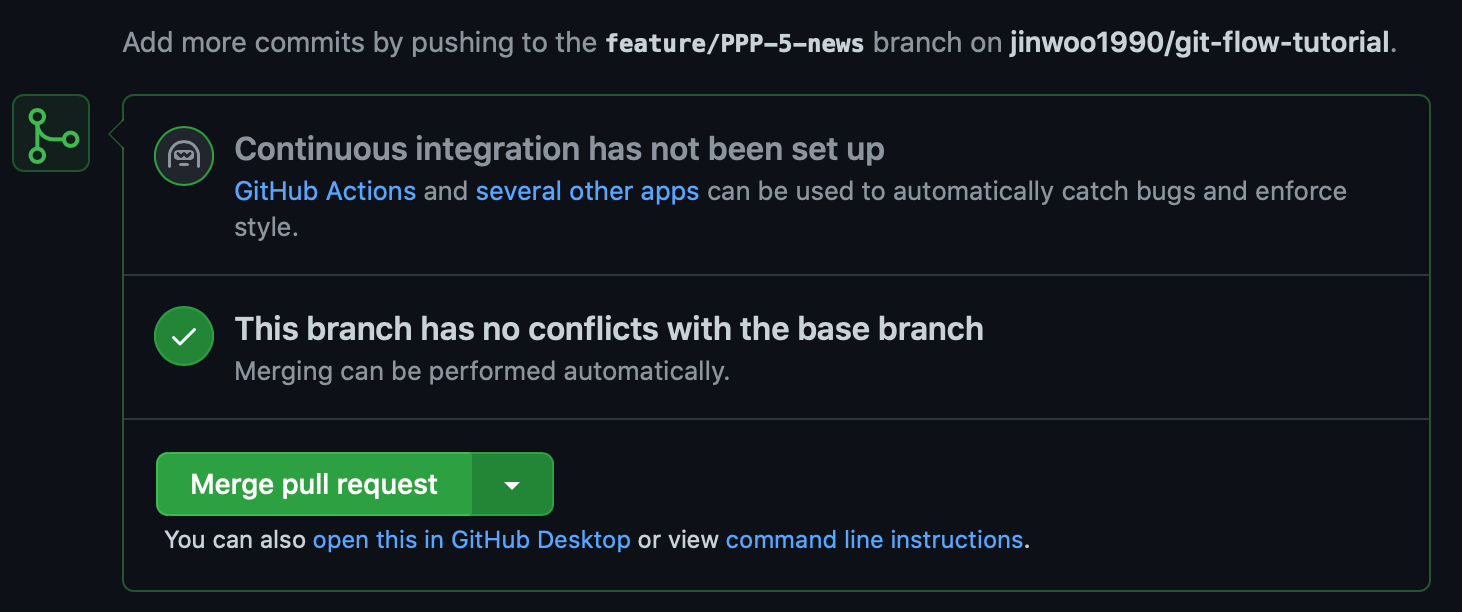
- Merge pull request 를 통해 PPP-5-news 내용을 develop 브랜치로 합침
- 기본적으로 Merge pull request 활용 (–no-ff 옵션과 유사하게 작용)
$ git flow feature finish PPP-5-news
Switched to branch 'develop'
Already up to date.
To https://github.com/jinwoo1990/git-flow-tutorial.git
 - [deleted]         feature/PPP-5-news
Deleted branch feature/PPP-5-news (was f02178b).

Summary of actions:
- The feature branch 'feature/PPP-5-news' was merged into 'develop'
- Feature branch 'feature/PPP-5-news' has been locally deleted; it has been remotely deleted from 'origin'
- You are now on branch 'develop'
- 완료 후 develop 브랜치를 최신화하고
git flow feature finish PPP-5-news실행- 로컬뿐만 아니라 원격에 있는 feature/PPP-5-news 도 제거됨

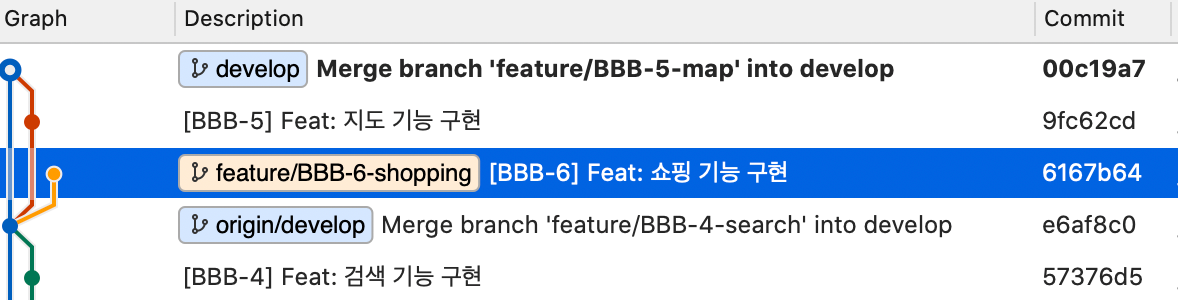
- 현재까지 이런 식으로 커밋 그래프가 그려짐
Feature 개발 마무리 전 커밋 이력 깔끔하게 만들기 (Finish 전 수행)
Squash
- 불필요하게 분리되어 있는 커밋들은 feature 개발 후 하나의 커밋으로 묶는 작업 수행
- 이슈당 하나의 커밋으로 만들면 코드리뷰와 유지보수가 편리해짐
$ git log --oneline
6e85528 (HEAD -> feature/PPP-6-blog) [PPP-6] Feat: 블로그 필터 기능 추가
6268f22 [PPP-6] Feat: 블로그 기능 추가
508a079 (origin/develop, develop) Merge pull request #2 from jinwoo1990/feature/PPP-5-news
f02178b [PPP-5] Feat: 뉴스 기능 구현
6bbdec5 Merge branch 'feature/PPP-4-login' into develop
0e5a183 [PPP-4] Feat: 로그인 기능 구현
dd52626 [PPP-3] Chore: requirements.txt 파일 추가
5a34a24 [PPP-2] Chore: .gitignore 파일 추가 및 git hook 파일 추가
d7b88a1 [PPP-1] Docs: README 문서 추가
b73ffdb (origin/master, master) Initial commit
git log를 통해 돌아가고 싶은 커밋 위치를 확인- 이 경우에는
508a079커밋을 시작점으로 돌아가6268f22커밋과6e85528커밋을 하나로 합쳐 PPP-6 이슈의 ‘[PPP-6] Feat: 블로그 기능 추가’ 과 ‘[PPP-6] Feat: 블로그 필터 기능 추가’를 ‘[PPP-6] Feat: 블로그 기능 구현 및 필터 추가’ 로 수정하고자 함
$ git rebase -i 508a079
pick 6268f22 [PPP-6] Feat: 블로그 기능 추가
pick 6e85528 [PPP-6] Feat: 블로그 필터 기능 추가

# Rebase 508a079..6e85528 onto 508a079 (2 commands)
#
# Commands:
# p, pick <commit> = use commit
# r, reword <commit> = use commit, but edit the commit message
# e, edit <commit> = use commit, but stop for amending
# s, squash <commit> = use commit, but meld into previous commit
# f, fixup <commit> = like "squash", but discard this commit's log message
# x, exec <command> = run command (the rest of the line) using shell
# b, break = stop here (continue rebase later with 'git rebase --continue')
# d, drop <commit> = remove commit
# l, label <label> = label current HEAD with a name
# t, reset <label> = reset HEAD to a label
# m, merge [-C <commit> | -c <commit>] <label> [# <oneline>]
git rebase -i <돌아가고 싶은 커밋 시점>을 통해 돌아가고 싶은 커밋 시점 이후의 커밋 내용을 수정- squash 외에도 커밋 메세지 수정 등 다양한 작업 개별 커밋을 지정해 수행할 수 있음
- <돌아가고 싶은="" 커밋="" 시점=""> 을 master나 develp 등 브랜치명으로 지정하면 그 브랜치의 최신값을 기준으로 돌아가버림. git log 를 찍어보면 각 커밋 옆에 어떤 브랜치가 어느 커밋 위치에 해당하는 지 보이는데 브랜치명으로 커밋 시점을 정하면 그 위치로 간다고 생각하면 됨
pick 6268f22 [PPP-6] Feat: 블로그 기능 추가
squash 6e85528 [PPP-6] Feat: 블로그 필터 기능 추가

# Rebase 508a079..6e85528 onto 508a079 (2 commands)
- pick 으로 되어 있는 부분을 squash 아니면 s 로 수정
- squash 나 s 로 변경한 부분 위에 합칠 수 있는 커밋이 존재해야 함
# This is a combination of 2 commits.
# This is the 1st commit message:

[PPP-6] Feat: 블로그 기능 추가

# This is the commit message #2:

[PPP-6] Feat: 블로그 필터 기능 추가
- 위와 같은 화면이 나오면 해당 커밋 내용을 수정하기 원하는 내용으로 변경
# This is a combination of 2 commits.
[PPP-6] Feat: 블로그 기능 구현 및 필터 추가
- 첫번째 커밋과 두번째 커밋을 지우고 ‘[PPP-6] Feat: 블로그 기능 구현 및 필터 추가’ 로 변경
6056a8a (HEAD -> feature/PPP-6-blog) [PPP-6] Feat: 블로그 기능 구현 및 필터 추가
508a079 (origin/develop, develop) Merge pull request #2 from jinwoo1990/feature/PPP-5-news
f02178b [PPP-5] Feat: 뉴스 기능 구현
6bbdec5 Merge branch 'feature/PPP-4-login' into develop
0e5a183 [PPP-4] Feat: 로그인 기능 구현
dd52626 [PPP-3] Chore: requirements.txt 파일 추가
5a34a24 [PPP-2] Chore: .gitignore 파일 추가 및 git hook 파일 추가
d7b88a1 [PPP-1] Docs: README 문서 추가
b73ffdb (origin/master, master) Initial commit
- 로그를 다시 확인하면
508a079을 시작점으로 남아있고6268f22커밋과6e85528커밋은6056a8a커밋으로 합쳐진 것을 확인할 수 있음
Rebase
git pull --rebase origin develop
- Feature 개발 과정 중에도 주기적으로 수행하지만 finish 하기 전에 원격 develop 과 rebase를 통해 커밋 로그를 깔끔하게 관리 가능
Release 하기
git flow release start 0.1
$ git flow release start 0.1
Switched to a new branch 'release/0.1'

Summary of actions:
- A new branch 'release/0.1' was created, based on 'develop'
- You are now on branch 'release/0.1'

Follow-up actions:
- Bump the version number now!
- Start committing last-minute fixes in preparing your release
- When done, run:

     git flow release finish '0.1'
- develop 브랜치를 기준으로 배포를 위한 브랜치를 생성
git flow release start 0.1를 입력하면release/0.1로 브랜치 생성
- 기능 개발 후 master로의 배포와 QA 목적으로 활용
- 생성 후 기능 개발 하지 않고 버그 수정만 수행하고 develop 브랜치에서는 새로운 release를 위한 개발 별도 진행
개발 코드 커밋
$ git commit -m '[PPP-8] Fix: 검색 기능 에러 수정'
- release 브랜치의 경우 브랜치명에 지라 이슈 번호가 없어 git hook 을 통한 자동 이슈 번호 태깅이 불가능함
- 직접 ‘[PPP-8] ‘ 입력 후 커밋 메세지 작성 필요
- 수정할 버그가 없으면 따로 개발 작업 수행 필요 없음
- QA 팀이 없거나 하면 배포 용도로만 활용 가능
git flow release finish 0.1
$ git flow release finish 0.1
- Release 브랜치 QA 작업 후 master 와 develop 브랜치에 merge
- git 에서 다음과 같은 기능을 한 번에 수행
git checkout mastergit merge --no-ff release/0.1git tag -a 0.1git checkout developgit merge --no--ff release/0.1git branch -d release/0.1
Merge branch 'release/0.1' into master
# Please enter a commit message to explain why this merge is necessary,
# especially if it merges an updated upstream into a topic branch.
#
# Lines starting with '#' will be ignored, and an empty message aborts
# the commit.
git flow release finish를 실행하면 다음과 같은 창이 나오는데 master merge 메세지 입력 가능- 수정하지 않음
#
# Write a message for tag:
#   0.1
# Lines starting with '#' will be ignored.
- Enter 쳤을 때 git 태그의 annotation 입력을 위한 창이 다시 뜸
- [주의] 메세지를 안 적어주면 태깅 자체가 안 됨. 반드시 적어줘야 함
0.1
#
# Write a message for tag:
#   0.1
# Lines starting with '#' will be ignored.
- 0.1 로 똑같이 브랜치 태그명과 같이 메세지를 적어줌
Release version 0.1,version 0.1,v0.1처럼 규칙을 정해 적어줄 수도 있음
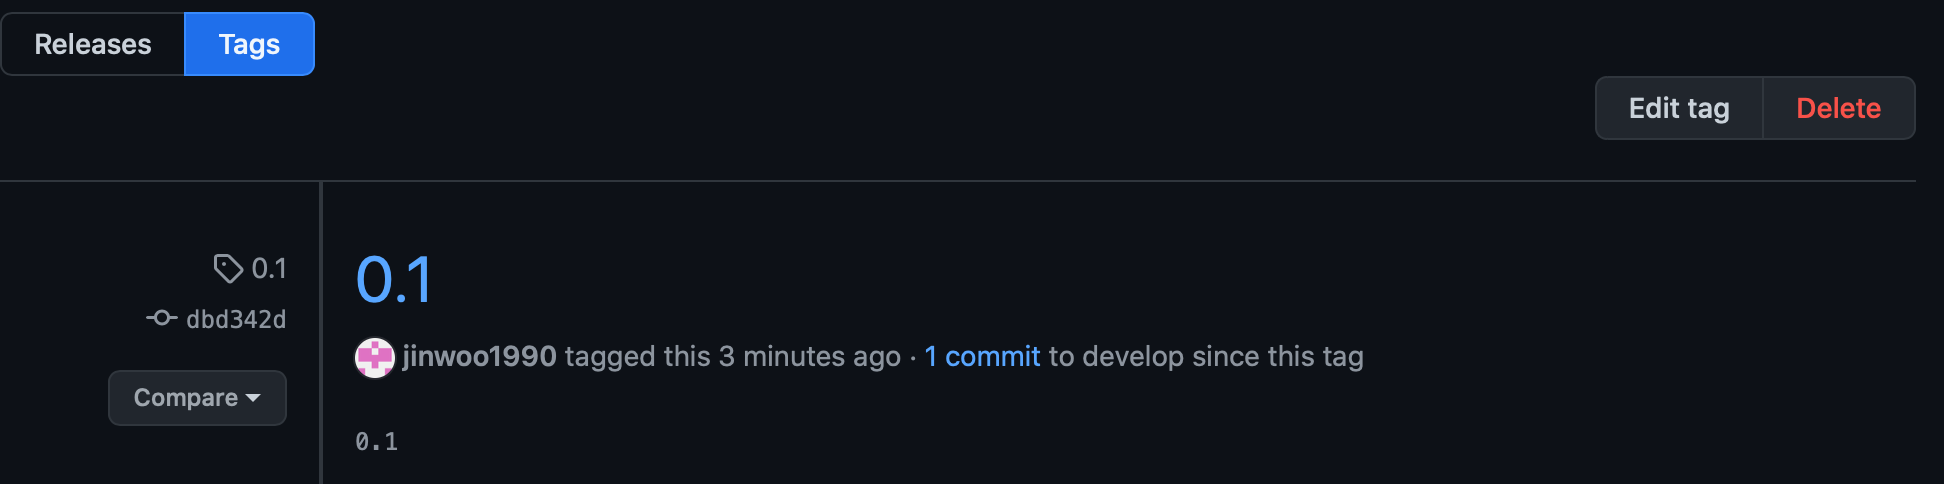
- 0.1 라고 회색으로 적힌 부분이 메세지 작성을 통해 입력되는 부분
- 파란색으로 적힌 0.1 부분은 release/0.1 에 브랜치명을 참조해서 생성됨
Merge tag '0.1' into develop

0.1
# Please enter a commit message to explain why this merge is necessary,
# especially if it merges an updated upstream into a topic branch.
#
# Lines starting with '#' will be ignored, and an empty message aborts
# the commit.
- develop 브랜치로 0.1 태그가 달린 커밋을 merge해 release에서 변경 사항이 있으면 develop에서 적용
git push origin develop & git push origin master
# develop 브랜치에서 수행
$ git push origin develop
# master 브랜치에서 수행
$ git push origin master
- 로컬에서 작업한 내용들을 원격 저장소로 push
git push –tags
$ git push --tags
Enumerating objects: 1, done.
Counting objects: 100% (1/1), done.
Writing objects: 100% (1/1), 156 bytes | 156.00 KiB/s, done.
Total 1 (delta 0), reused 0 (delta 0), pack-reused 0
To https://github.com/jinwoo1990/git-flow-tutorial.git
 * [new tag]         0.1 -> 0.1
- release 과정 중에 생긴 태그는 별도로 push 필요
- 태그는 git 에서 브랜치와 비슷한 단위의 개념으로 브랜치를 push 하듯이 별도 push가 필요함

- 위 그림에서 보듯이 브랜치와 태그는 각각의 개념으로 관리됨을 알 수 있음
Hotfix 작업
git flow hotfix start 0.2
$ git flow hotfix start 0.2
Switched to a new branch 'hotfix/0.2'

Summary of actions:
- A new branch 'hotfix/0.2' was created, based on 'master'
- You are now on branch 'hotfix/0.2'

Follow-up actions:
- Start committing your hot fixes
- Bump the version number now!
- When done, run:

     git flow hotfix finish '0.2'
- master 브랜치를 기준으로 배포를 위한 브랜치를 생성
git flow hotfix start 0.2을 입력하면hotfix/0.2로 브랜치 생성
- 서비스 중인 코드가 문제 생겼을 때 급하게 반영 위해 사용
개발 코드 커밋
$ git commit -m '[PPP-9] HotFix: 로그인 기능 에러 수정'
- hotfix 브랜치의 경우에도 git hook을 이용할 수 없어 이슈 번호를 앞에 적어 커밋 메세지 작성
- hotfix의 경우 타입을 HotFix로 고정
git flow hotfix finish 0.2
- Hotfix 브랜치 QA 작업 후 master 와 develop 브랜치에 merge
- git 에서 다음과 같은 기능을 한 번에 수행
git checkout mastergit merge --no-ff hotfix/0.2git tag -a 0.2git checkout developgit merge --no--ff hotfix/0.2git branch -d hotfix/0.2
0.2
#
# Write a message for tag:
#   0.2
# Lines starting with '#' will be ignored.
- release 때와 마찬가지로 태그 설명을 적어주면 작업 완료
git push origin develop & git push origin master & git push –tags
- release 때와 마찬가지로 원격 develop, master 브랜치와 릴리즈 버전 태그를 push해 원격 저장소에 반영
커밋 메세지 작성 방법
Semantic commit messages
커밋 메세지 가독성 향상과 협업을 위해 Udacity 에서 고안된 커밋 메세지 작성법
양식
[지라 이슈 번호] 타입: 커밋 설명
설명
예시
[PPP-9] Hotfix: 로그인 기능 에러 수정

xx 때문에 yy 버그가 일어남. zz 수정을 통해 버그 수정 (Optional)
- 타입
- Feat - 새로운 기능 추가 (0e5a183)
- Fix - 버그 수정 (ce2ba5a4)
- Hotfix - 라이브 서버 바로 적용 필요 버그 수정 (f6afbc2)
- Refactor - production code의 결과에는 변함이 없으나 그 과정이 개선되었을 때 (21ff59b)
- Docs - 주석 및 Readme 등 문서 수정 (d7b88a1)
- Style - production code에 영향 주지 않는 줄바꿈, 세미콜론 추가 등 (db2be13)
- Test - 테스트 코드 추가 및 수정 (1e43e9)
- Chore - 빌드 명령, 패키지 매니저, config 수정 (dd52626)
- 작성 규칙
- 타입 이름 첫 문자 대문자로 작성
- 문장 끝 마침표 사용 금지
- 설명은 커밋 메세지 작성 시 엔터 두 번을 통해 칸을 띄워서 작성
- 그래야 커밋 히스토리를 한 줄로 볼 때 제목/내용처럼 분리되어 보임
- 설명은 꼭 필요한 경우에만 작성
마치며
Git Flow 는 브랜치를 관리하고 프로젝트를 효과적으로 수행하기 위한 하나의 방법론이다. 이 외에도 Github Flow 등 더 단순한 형태지만 배포의 편의성을 더 고려한 방법론도 존재한다. 브랜치 전략별로 장단점이 있기 때문에 프로젝트와 팀 규모에 맞게 적절한 방법론을 택하고 사용하기 적절한 방식으로 활용 하는 것이 중요하다고 생각한다.
포스트의 예시에서는 하나의 remote 브랜치에서 작업하는 상황을 가정했다. 규모가 큰 프로젝트에서는 개발의 안정성을 위해 upstream repository에서 fork한 remote 브랜치를 통해 개발자 각각이 개발을 진행하는 좀 더 복잡한 운영 방식도 존재한다. 더 자세한 내용들을 알고 싶다면 아래 링크들을 참조하기 바란다.
References
- https://woowabros.github.io/experience/2017/10/30/baemin-mobile-git-branch-strategy.html
- https://yoonghee.tistory.com/78
- https://velog.io/@imbolic0301/Merge-기반의-git-convention-예시
- https://dev-yakuza.posstree.com/ko/git/git-squash/
- https://serebrov.github.io/html/2019-06-16-git-hook-to-add-issue-number-to-commit-message.html
Leave a comment